Fitness Motion Recognition with Android Wear

Wearables are a natural match for a company like Freeletics. We’ve been experimenting with Android Wear and the Apple Watch since their release. One area in particular that we’re interested in is the ability to automatically track your workout with a wearable while you’re doing it.
Motion Recognition?
Motion recognition is a huge topic and limiting it to fitness recognition doesn’t reduce the scope that much. There are 3 areas that can be individually addressed ranging from the most general to the most specific.
Segmenting exercise from non-exercise
This is the problem of determining when a user has started an exercise that should be tracked. It presupposes that the user is wearing a wearable continuously and doesn’t actively start the motion recognition. It could also be used to automatically pause tracking when the user takes a break.
Recognizing which exercise is being performed
Once tracking has been started (manually or automatically), the next challenge is to recognize which exercise is being performed. This has the additional difficulty that a user could switch exercises during a session, so each repetition needs to be recognized individually.
Counting repetitions of a known exercise
The most focused and easiest to solve problem is counting repetitions of an exercise that is known beforehand. The algorithm can be very specialized and ignore the edge cases and complications of the previously discussed situations.
This post will only discuss the last case: counting repetitions of a known exercise. An additional constraint that we’ll make is that the motion recognition algorithm must be an online algorithm, meaning that it counts as the data arrives and not as a post-processing step.
Let’s do some pushups!
At first glance, pushups might seem to be a difficult motion to recognize with a wearable. After all, your wrist isn’t really moving at all during the exercise. The secret to simplifying the algorithm is the Freeletics style of pushup. Check out the video below and notice that the hands are lifted at the bottom of each repetition.
This lifting of the hands gives us an acceleration that can be easily measured with a wearable on the wrist. This also enforces that the pushup is executed with the correct form. If you get tired at the end of your session and don’t lift up your hands, no rep!
Show me the data
To get an idea of what kind of algorithm is necessary to detect repetitions, let’s take a look at the data that the accelerometer provides. The following snippet dumps the sensor data to a file as it’s received. It also calculates the magnitude of the acceleration vector because it’s more useful than the vector components.
BufferedWriter writer = ...
SensorEventListener listener = new SensorEventListener() {
    @Override
    public void onSensorChanged(SensorEvent event) {
        float[] values = event.values;
        float magnitude = (float) Math.sqrt(values[0] * values[0] + values[1] + values[1] + values[2] * values[2]);
        writer.write(String.format("%f, %f, %f, %f, %f", event.timestamp, magnitude, values[0], values[1], values[2]));
    }

    @Override
        public void onAccuracyChanged(Sensor sensor, int accuracy) {
    }
}

SensorManager sensorManager = (SensorManager) context.getSystemService(Context.SENSOR_SERVICE);
List<Sensor> sensors = sensorManager.getSensorList(Sensor.TYPE_ACCELEROMETER);
sensorManager.registerListener(listener, sensors.get(0), SensorManager.SENSOR_DELAY_UI);
After copying the data file from the device to your computer, you can graph it using gnuplot:
set xlabel "Time (s)"
set ylabel "Magnitude (m/s^2)"
plot filename using ($1/1000000000):2 with lines title "Acceleration"
And you’ll get a graph that looks like this:
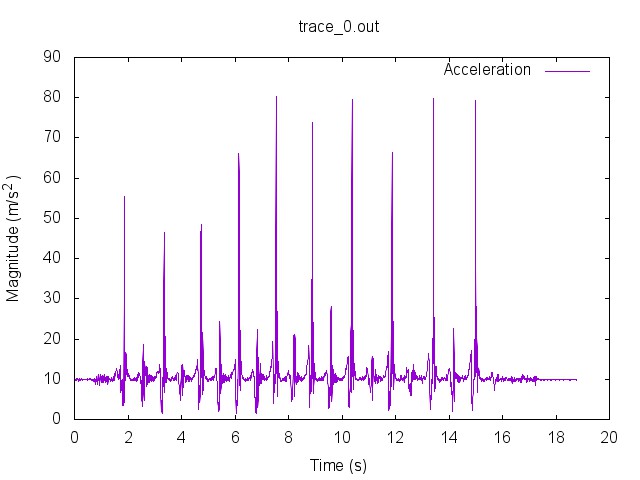
The repetitions are definitely easy to recognize in the plot. Lifting the hands at the bottom of the pushup leads to a large acceleration spike. The smaller spike in between the large spikes is the acceleration from changing directions at the top of the pushup movement.
Algorithm selection
Because the repetitions are so easy to recognize and there’s not too much noise in the data we can choose a relatively simple algorithm. The type of algorithm that we’re looking for is an online peak detection algorithm. Online algorithms were discussed earlier. Peak detection is a common problem in data processing and there are plenty of algorithms to accomplish what we want. An important requirement when developing for wearables is battery efficiency, so a simple algorithm with fewer operations would be ideal.
After some googling and testing, peakdet was chosen as a viable algorithm. A version ported to Java looks like this:
public class PeakDetProcessor {

    float minValue = Float.MIN_VALUE;
    float maxValue = Float.MAX_VALUE;
    long minTimestamp = 0;
    long maxTimestamp = 0;

    boolean lookForMax = true;
    private double delta;

    public PeakDetProcessor(double delta) {
        this.delta = delta;
    }

    public boolean processPoint(long timestamp, float value1, float value2, float value3) {
        float magnitude = (float) Math.sqrt(value1 * value1 + value2 * value2 + value3 * value3);

        if (magnitude > maxValue) {
            maxValue = magnitude;
            maxTimestamp = timestamp;
        }
        if (magnitude < minValue) {
            minValue = magnitude;
            minTimestamp = timestamp;
        }

        if (lookForMax) {
            if (magnitude < maxValue - delta) {
                // record maxTimestamp and maxValue as a max point
                minValue = magnitude;
                minTimestamp = timestamp;
                lookForMax = false;

                // Only emit mins
                return false;
            }
        } else {
            if (magnitude > minValue + delta) {
                // record minTimestamp and minValue as a min point
                maxValue = magnitude;
                maxTimestamp = timestamp;
                lookForMax = true;
                return true;
            }
        }

        return false;
    }
}
Notice that if you remove the magnitude calculation (which would be necessary for every algorithm) there are no transcental functions or other operations that might be expensive to calculate for each data point. This is a pretty efficient algorithm. The question still remains whether it satisfies our requirements.
Plugging 40 into the delta parameter, running the algorithm and plotting the result produces a graph like this:
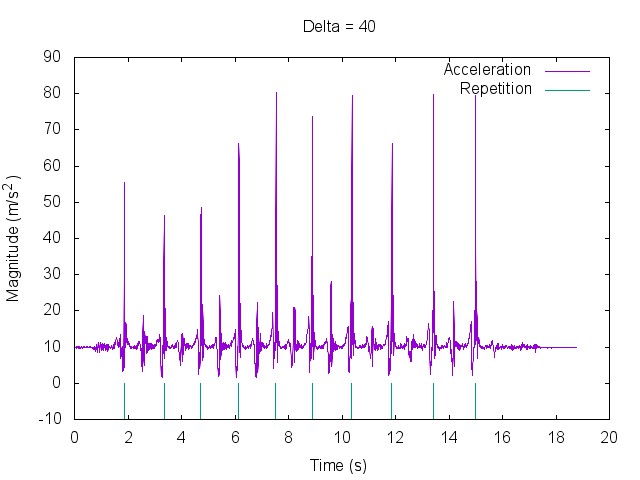
Looks pretty good! Now what is that delta parameter and where did 40 come from?
A point is considered a maximum peak if it has the maximal value, and was preceded (to the left) by a value lower by
delta.
The value of delta is therefore going to be very dependent on how the user executes their pushups. Somebody who slams their hands into the ground on every repetition is going to need a much higher delta than someone who does a dainy tap.
Finding the optimal value for this parameter for each user is an open problem. Maybe it makes sense to have the users complete a calibration before starting. This could be integrated into a workout to eliminate the perceived interruption. As an example, here’s what would happen if 20 was used as the value of delta:

The algorithm now overestimates the number of pushups by a factor of 2 for this user and these data.
Battery Efficiency
If your battery dies while you’re doing pushups, it doesn’t matter how correct the algorithm is. This is why battery efficiency has to be a strong deciding factor in the selection of any algorithm. Here are some tips to make the best of the limited energy that wearables have:
Analyze fewer samples
The code above uses the Sensor.SENSOR_DELAY_UI refresh interval, which is approximate 15Hz. If the motion that’s being recognized allows it and the algorithm works with a lower frequency, there are other constants available. Try to find the lowest frequency that correctly recognizes the motion.
Do less analysis per sample
Choose an efficient algorithm. Don’t do any unnecessary work on a data sample. That’s all there is to this one.
Analyze samples on the phone
Send the data to an attached phone to be analyzed. The results can be sent back to the wearable. Depending on the situation, this could be more battery efficient. Transferring the data isn’t cheap though.
Choose less power hungry sensors
Different sensors on different devices have a different power drain. You can ask the sensor how much power it uses with the Sensor.getPower() method. If it suits your situation, you can dynamically choose the most efficient algorithm depending on the hardware.
There are lots of resources about battery efficiency on the internet. It’s something that Google has been pushing quite heavily recently. Most ideas presented for phones also apply to wearables.
References
Most of this material comes from my presentation at droidcon, Berlin 2015. You can watch the presentation on YouTube and view the slides on Speakerdeck. A sample app is available on GitHub.
This isn’t a new topic and is indeed itself an academic research area. Here are some academic papers that I found useful: